Here's one of my first project that I completed (super duper fast too!) for my Beach-themed pianoscape that I'll be working on this week.
I bought these two pillar candles at Dollar Tree (the best thing is, you can reuse these candles for ever, so it's just the initial $2.00 expense!). I had some of the awesome fabric leftover from my Photo Pillow project and my Beach insprired wreath to wrap around the candles. I hot glued the piece on (just where the fabric overlaps each other, that way I can take these off to reuse the candle), then attached the starfish. Easy-peasy decorating! These starfish were only .40 each, so basically under a $1.00 for this project (of course, if you need to go out and purchase the candles it will be a $3.00 project! LOL!).
Please stop by each day as I try and get another beach-themed idea for you!
Linking up to these great decorating parties:
CraftOManiac
TaterTots and Jello
Uncommon Designs
Savvy Southern Style
The 36th Avenue
Five Days, Five Ways
French Country Cottage
I Should be Mopping the Floor
At the Picket Fence
Showing posts with label dollar crafts. Show all posts
Tuesday, July 24, 2012
Monday, July 9, 2012
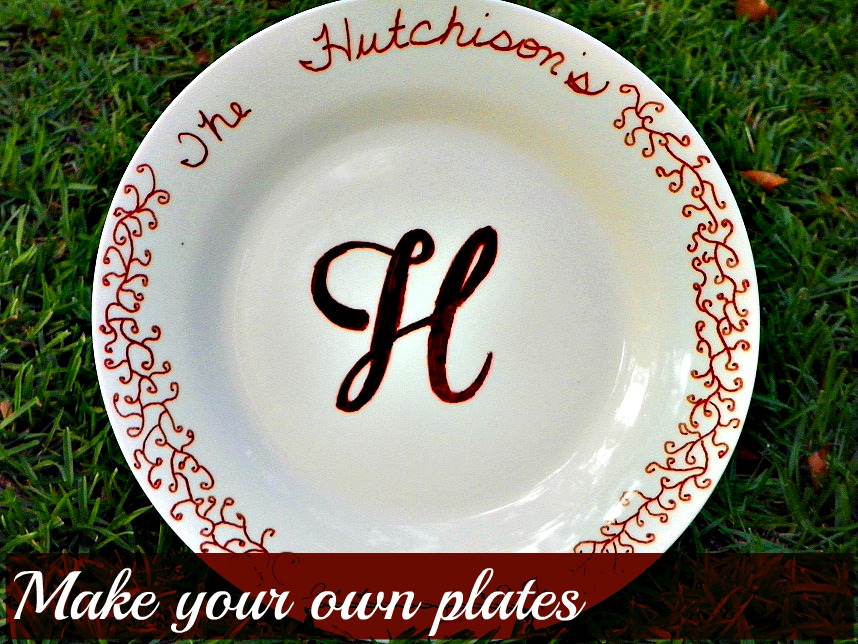
Make your own plates ~ Another Dollar store craft
As you can see, Ms. M. is at the table with all of our supplies: plates, sharpie markers (in a ton of colors!), tape for our home-made stencils, and that's it! (Oh my, oh my, this would be so much easier with a Silhouette! LOL!....Santa, can you hear me???????)
All we did was figure out ahead of time what we wanted to do. Just beware, once you've marked on the plate, you can't erase it, so we were pretty careful :)
I wanted to do a monogrammed initial plate for my soon-to-be initial wall in our bedroom. I'm pretty happy with the way it turned out.
I wasn't sure of what Ms. M. had decided to do, but I LOVE what she did!
This is a great idea to do with the kids, especially when it's 98 outside, with a heat index of 110! It didn't take us long to make them. After you get done with your art, place in a 150 degree oven for 30 minutes and they're done!
Great idea for a grandparent would be to outline the kids hands on a plate, have them color it and date it! I love the monogram plates too....very frugal idea for a dinner party and will only cost you $1.00 per plate!
I can’t thank y’all enough for stopping by and taking a peek into my little craft world! Please be sure to leave a comment, I love and read each one!!! I'm sharing this decorating idea with the following link-up parties:
CraftOManiac
TaterTots and Jello
Uncommon Designs
Savvy Southern Style
The 36th Avenue
Five Days, Five Ways
French Country Cottage
I Should be Mopping the Floor
At the Picket Fence
Friday, July 6, 2012
Ball Jar Soap Dispenser.....Dollar Craft
The way I did mine came out to $1.00! Yep, just one smack-a-roo. Thrifty and frugal, gotta love it! I already had the jar (given to me), so all I needed was the hand soap from my local Dollar Tree.
It was a cute dispenser anyway!
Here’s a quick list of what you’ll need:
1 Ball jar, any size
1 container of hand soap (be sure it also has the pump)
6000 glue, pliers, either a drill with large bit, or just a large nail and hammer
For the lid, all I did was start a hole in the center. I worked my pliers, pulling back the tin until I had a hole big enough that would accommodate the pump. (This part was easy, as the tin is not especially thick.)
As soon as you know it fits, take 6000 glue and glue the cap around the pump to the lid. I put it between two blocks to let it dry overnight.
Just be sure that the hose just touches the bottom of your jar (I had to cut mine a little to make it shorter). Pour in the soap, then attach the lid and jar ring. There you have it! So kitchey-cute, great for presents with jute twine or initials done in vinyl!
Pin It
I can’t thank y’all enough for stopping by and taking a peek into my little craft world! Please be sure to leave a comment, I love and read each one!!! I'm sharing this decorating idea with the following link-up parties:
CraftOManiac
TaterTots and Jello
Design Dazzle
Uncommon Designs
Savvy Southern Style
The 36th Avenue
Five Days, Five Ways
French Country Cottage
I Should be Mopping the Floor
At the Picket Fence
Be sure to go by and see all of the other great ideas for DIY crafting!
Friday, June 1, 2012
Dollar Tree project ~ 4th of July tins
I bartered with a friend and had her put the sayings on these with her Cricut (MAN-OH-MAN, I've GOT to get a Silhouette for Christmas this year....I'd have WAAAAYYYYYY to much fun! LOL!) I thought the kids would get a kick out of doing a couple of little fireworks this year. The "tame" ones {if there is such a thing} like sparklers and a couple others {I wonder if they still have those ones that expand like black snakes, can't remember what they're called}. I'll be putting them in these little tins closer to the 4th. Part of my tablescape this year! Not too shabby for only $3.00!
The top picture is shown with them next to my FREE SUBWAY ART PRINTABLE! Be sure to download it HERE !
Sharing this on-going project with the following AWESOME link-up parties!!!
CraftOManiac
TaterTots and Jello
Design Dazzle
Uncommon Designs
Savvy Southern Style
The 36th Avenue
Five Days, Five Ways
French Country Cottage
I Should be Mopping the Floor
Be sure to go by and see all of the other great ideas for DIY crafting!
Friday, March 9, 2012
Butterfly Garden Kids Craft...........
So many times I’ve been the lucky recipient of her “daudles and doodles” (I’m such a lucky momma! ), but I have to say, when she brought this to me, I was FLOORED! She’s notorious for buying things at the Dollar Tree, then not really doing anything with them, or not liking what she came up with! LOL! I don’t know what it is about her “Butterfly Garden”, but I’m LOVIN’ IT!!! Could it be that I loved (and still love) butterflies? I had the coolest canopy bed with a butterfly bedspread and matching canopy when I was little, I guess it’s just carried over into my {ah-hem} old age!
Well enough talking, so here’s a picture of what she came up with!
Didn’t she do a FAB job?
If you’d like to make one with your child, here’s a list of supplies that you’ll need:
Dollar Tree items:
1 pack of Sheer butterflies
1 pack of foam floral disks
1 pack of colored floral wire
Stuff around the house:
Remnant of felt or fabric to cover foam disk
20” length of ribbon
Straight pins or hot glue
Cover foam disk with either fabric or felt. You can use straight pins or hot glue to keep in place. Then take the colored floral wire {they also have different colors of wire, as seen in the stock photo}, cut into different lengths. The butterflies already have wire on the back of them, so just wrap around floral wire.
Insert the wire into the foam (you’ll need to poke something through the fabric/foam to get your wire started}. As you can see from the picture, she staggered them a little, then bent the wire (‘cause butterflies don’t fly straight, they FLUTTER!!!!! Teeheehee!)
Take your ribbon and tie around the bottom of the foam. You’re done!!! How easy-peasy was that?
We’ll probably need to make a run to the “tree” this weekend. I’d love to have different colored butterfly gardens for our spring decorating. What about a Butterfly Bouquet? Just add several more butterflies in different colors, on different colored wires, then add to a pot! Add easter grass, soooooo cute!
This is such a sweet project, and even sweeter that my 11 year old daughter came up with the idea! So proud of you Ms. M!!!!
Y’all be sure to leave a comment! I’m sure Ms. M would squeal to know someone left a comment on her original crafty idea! Please leave your bloggy addy too, I’d love to hop on over and checkout your craftiness too
I'm sharing this decorating idea with the following link-up parties:
CraftOManiac
TaterTots and Jello
Design Dazzle
Uncommon Designs Online
The 36th Avenue
Savvy Southern Style
Be sure to go by and see all of the other great ideas for DIY crafting!
Pin It
Friday, March 2, 2012
Dollar Craft ~ Pizza Pan Magnet Board
I don’t know about you, but I can’t get enough of storage space or places to put important papers. When I do need more of this space, I like things to look purty! This is a great project that is so easy and extremely budget-friendly! All-in-all, I think I spent under $2.00 for this magnet board!!!
Here’s a list of supplies that you’ll need:
1 Pizza Pan (purchased for $1.00 at the Dollar Tree)
1 sheet of 12”x12”scrapbook paper (purchased at HL for .24….1/2 off sale!)
1 pack of Glass Gems
(Purchased for $1.80 {used my 40% coupon at HL}, but you’ll only need about 4-5, so about .05 each)
Decoupage, sponge brush, scissors, ribbon, magnets
I decided to paint my pizza pan in a coordinating color, but you really don’t need to, as most of the pan will be covered by your piece of paper. It only took two coats and 10 minutes to dry inbetween.
I actually went through more trouble than was necessary when it came to making a pattern for the inside circle, so I’ll give you the shortcut that I should have done LOL!. All you need to do is take the paper and push it down and run your fingernails around the grove of the circle (you can see from the picture what I mean). Cut around it, then trace it on to the backside of your paper.
You could actually just use spray adhesive if you have some, but I used the decoupage instead.
You could actually stop here, then go on to make your magnets, but I did decoupage the top of it as well. To be honest, I freaked out a little after I put the decoupage medium on top of the paper, as it started to bubble and wave………but, all I did was take a straight pin and poked holes in the bubbles just a little, then when I woke up the next morning to check on it, the bubbles had gone away!!! YEA {really thought I had messed up, but glad it worked out ok!}
I know my “finished” picture doesn’t show it, but now you could just take your 6000 epoxy (or hot glue)and glue some pretty ribbon to the back of the pan to hang it {I will take pictures of it hanging on my daughters wall, but need to paint her room first}.
FOR THE MAGNETS:
I purchased a 2 pound bag of glass gems from my local Hobby Lobby. They were $2.99, but I had my 40% off coupon, making them $1.79. I only used 4 for the magnets, so they came out to around .05 each……plenty left over for more projects! *WINK*
I had 4 pieces of the scrapbook paper left, perfect size for the gems! Sponge on the decoupage to the flat side of the gem, then place on the paper {as you can see, I placed them over a pretty part of the paper}.
It only took about 20 minutes for it to dry, then I cut the paper around the gem. You could decoupage the back if you’d like, but I chose not to.
I plan on getting the stronger, round magnets from the craft store this weekend, but you can cut up all of those free sheet magnets that you get from companies! That would be a great way to recycle those. They are not that strong, but would work in a pinch. Glue the magnets on with the 6000 epoxy and your done! !!!! WhooHOO!!!!
Voila!
If you like craft fairs, these would be awesome to sell! Very little MULAH goes into one, and the color combos are AH-mazing! I think you’d be able to make a great profit, especially since each one would cost under $2.00 to make. Can you imagine using school colors, and maybe an initial in the middle (great for those vinyl cutting machines!) This would be such a SHWEET and unique birthday present too!
A note or two for ya! The Dollar Tree does sell the large glass gems as well, but the day I was there they were completely sold out. They are about 1 ½” in diameter, so it would be super cute to decoupage PICTURES and give a set to the in-laws {or outlaws, depending LOL!}. Y’all be sure to leave a comment! I read each one and would love to hop on over to your blog too! I'm sharing this decorating idea with the following link-up parties:
CraftOManiac
TaterTots and Jello
Design Dazzle
Uncommon Designs Online
Be sure to go by and see all of the other great ideas for DIY crafting!
Pin It
Here’s a list of supplies that you’ll need:
1 Pizza Pan (purchased for $1.00 at the Dollar Tree)
1 sheet of 12”x12”scrapbook paper (purchased at HL for .24….1/2 off sale!)
1 pack of Glass Gems
(Purchased for $1.80 {used my 40% coupon at HL}, but you’ll only need about 4-5, so about .05 each)
Decoupage, sponge brush, scissors, ribbon, magnets
I decided to paint my pizza pan in a coordinating color, but you really don’t need to, as most of the pan will be covered by your piece of paper. It only took two coats and 10 minutes to dry inbetween.
I actually went through more trouble than was necessary when it came to making a pattern for the inside circle, so I’ll give you the shortcut that I should have done LOL!. All you need to do is take the paper and push it down and run your fingernails around the grove of the circle (you can see from the picture what I mean). Cut around it, then trace it on to the backside of your paper.
You could actually just use spray adhesive if you have some, but I used the decoupage instead.
You could actually stop here, then go on to make your magnets, but I did decoupage the top of it as well. To be honest, I freaked out a little after I put the decoupage medium on top of the paper, as it started to bubble and wave………but, all I did was take a straight pin and poked holes in the bubbles just a little, then when I woke up the next morning to check on it, the bubbles had gone away!!! YEA {really thought I had messed up, but glad it worked out ok!}
I know my “finished” picture doesn’t show it, but now you could just take your 6000 epoxy (or hot glue)and glue some pretty ribbon to the back of the pan to hang it {I will take pictures of it hanging on my daughters wall, but need to paint her room first}.
FOR THE MAGNETS:
I purchased a 2 pound bag of glass gems from my local Hobby Lobby. They were $2.99, but I had my 40% off coupon, making them $1.79. I only used 4 for the magnets, so they came out to around .05 each……plenty left over for more projects! *WINK*
I had 4 pieces of the scrapbook paper left, perfect size for the gems! Sponge on the decoupage to the flat side of the gem, then place on the paper {as you can see, I placed them over a pretty part of the paper}.
It only took about 20 minutes for it to dry, then I cut the paper around the gem. You could decoupage the back if you’d like, but I chose not to.
I plan on getting the stronger, round magnets from the craft store this weekend, but you can cut up all of those free sheet magnets that you get from companies! That would be a great way to recycle those. They are not that strong, but would work in a pinch. Glue the magnets on with the 6000 epoxy and your done! !!!! WhooHOO!!!!
Voila!
If you like craft fairs, these would be awesome to sell! Very little MULAH goes into one, and the color combos are AH-mazing! I think you’d be able to make a great profit, especially since each one would cost under $2.00 to make. Can you imagine using school colors, and maybe an initial in the middle (great for those vinyl cutting machines!) This would be such a SHWEET and unique birthday present too!
A note or two for ya! The Dollar Tree does sell the large glass gems as well, but the day I was there they were completely sold out. They are about 1 ½” in diameter, so it would be super cute to decoupage PICTURES and give a set to the in-laws {or outlaws, depending LOL!}. Y’all be sure to leave a comment! I read each one and would love to hop on over to your blog too! I'm sharing this decorating idea with the following link-up parties:
CraftOManiac
TaterTots and Jello
Design Dazzle
Uncommon Designs Online
Be sure to go by and see all of the other great ideas for DIY crafting!
Pin It
Wednesday, February 22, 2012
Create your very own Button Art ~ Cross
Pin It
I’ve been eyeing all of the pretties on Pinterest lately and have come across some awesome button art! I’ve also wanted to make something with burlap! It’s so rustic and shabby chic at the same time. So I figured why not combine all of these lovelies?
I found this awesome frame at a thrift store for $1.00! I love the “art” that was inside of it. So sweet.....I can just imagine my grandmother loving a picture like this and wanting it framed as well.
As you can see, it was from a calendar……I’d love to know what year it’s from!
I love painted frames, so decided to do a faux-finish on this one. I added some burnt ochre paint to the white, then stippled it on lightly. I think the white paint would have been fine, and would look great with some strategic sandpaper scrapings, but decided to go with this look instead :)
I decided I really wanted a cross, so I hand-drew the outline to the shape of one I wanted. (Just think of the possibilities, if you can outline it, you can create button art! LOL!)
Trace it on your fabric or paper that you want, like I did on the burlap. (This would be pretty done on scrapbooking paper too!)
I have my jar of buttons ready to go!
First, I placed all of the buttons around the outline, that way I knew if everything would turn out ok……
Then I hot-glued all of the buttons in place.
I thought about making the whole cross with buttons, but actually liked the look of just the outline!
Y’all have fun and let me know if you decide to make your very own button art!!!! If you can find a frame at a yard sale or thrift store, you can do this project for under $5.00. It only cost me around $2.00, but I do have a stash of buttons that I've kept throughout the years ( you can also get great buttons for free or close to free when thrift stores have their "free" bin, or fill a bag for $x.xx ). You won't need much of the burlap either, and it's pretty cheap for the piece that I bought at Hobby Lobby, and I have plenty left for more craft projects!
I'm sharing this decorating idea with the following link-up parties:


Be sure to go by and see all of the other great ideas for DIY crafting!
Those of you coming over here from the other Links, be sure to enter my giveaway HERE for a monogrammed set of kitchen towels! Ends 2/26/2012.
I found this awesome frame at a thrift store for $1.00! I love the “art” that was inside of it. So sweet.....I can just imagine my grandmother loving a picture like this and wanting it framed as well.
As you can see, it was from a calendar……I’d love to know what year it’s from!
I love painted frames, so decided to do a faux-finish on this one. I added some burnt ochre paint to the white, then stippled it on lightly. I think the white paint would have been fine, and would look great with some strategic sandpaper scrapings, but decided to go with this look instead :)
I decided I really wanted a cross, so I hand-drew the outline to the shape of one I wanted. (Just think of the possibilities, if you can outline it, you can create button art! LOL!)
Trace it on your fabric or paper that you want, like I did on the burlap. (This would be pretty done on scrapbooking paper too!)
I have my jar of buttons ready to go!
First, I placed all of the buttons around the outline, that way I knew if everything would turn out ok……
Then I hot-glued all of the buttons in place.
I thought about making the whole cross with buttons, but actually liked the look of just the outline!
Y’all have fun and let me know if you decide to make your very own button art!!!! If you can find a frame at a yard sale or thrift store, you can do this project for under $5.00. It only cost me around $2.00, but I do have a stash of buttons that I've kept throughout the years ( you can also get great buttons for free or close to free when thrift stores have their "free" bin, or fill a bag for $x.xx ). You won't need much of the burlap either, and it's pretty cheap for the piece that I bought at Hobby Lobby, and I have plenty left for more craft projects!
I'm sharing this decorating idea with the following link-up parties:
Those of you coming over here from the other Links, be sure to enter my giveaway HERE for a monogrammed set of kitchen towels! Ends 2/26/2012.
Subscribe to:
Posts (Atom)