Pages

Showing posts with label craft. Show all posts

Monday, July 9, 2012

Make your own plates ~ Another Dollar store craft

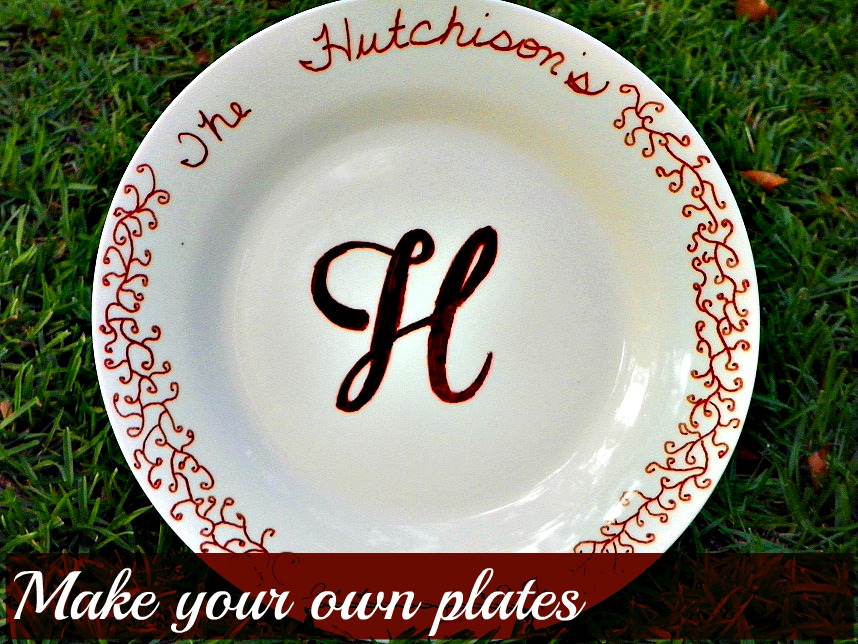
These plates were so much fun, and super-duper easy to make too! I bought 2 ceramic plates at Dollar Tree the other day....thought this would be a fun weekend craft for Ms. M. and I to try out. I've seen these on Pinterest before (I know, who hasn't, right?) and was a little skeptical on how they'd turn out (the markers not washing off). Well, I was delightfully surprised!

As you can see, Ms. M. is at the table with all of our supplies: plates, sharpie markers (in a ton of colors!), tape for our home-made stencils, and that's it! (Oh my, oh my, this would be so much easier with a Silhouette! LOL!....Santa, can you hear me???????)


All we did was figure out ahead of time what we wanted to do. Just beware, once you've marked on the plate, you can't erase it, so we were pretty careful :)

I wanted to do a monogrammed initial plate for my soon-to-be initial wall in our bedroom. I'm pretty happy with the way it turned out.


I wasn't sure of what Ms. M. had decided to do, but I LOVE what she did!


This is a great idea to do with the kids, especially when it's 98 outside, with a heat index of 110! It didn't take us long to make them. After you get done with your art, place in a 150 degree oven for 30 minutes and they're done!

Great idea for a grandparent would be to outline the kids hands on a plate, have them color it and date it! I love the monogram plates too....very frugal idea for a dinner party and will only cost you $1.00 per plate!

I can’t thank y’all enough for stopping by and taking a peek into my little craft world! Please be sure to leave a comment, I love and read each one!!! I'm sharing this decorating idea with the following link-up parties:

CraftOManiac
TaterTots and Jello
Uncommon Designs
Savvy Southern Style
The 36th Avenue
Five Days, Five Ways
French Country Cottage
I Should be Mopping the Floor
At the Picket Fence

Friday, July 6, 2012

Ball Jar Soap Dispenser.....Dollar Craft

I know, I know. These cute little Ball jar soap dispensers have been all over the ‘net, ‘specially my favorite, Pinterest! (By the way, come on by and follow me HERE .) But I just figured that on the off-chance of someone not finding the directions, you could use mine!

The way I did mine came out to $1.00! Yep, just one smack-a-roo. Thrifty and frugal, gotta love it! I already had the jar (given to me), so all I needed was the hand soap from my local Dollar Tree.


It was a cute dispenser anyway!

Here’s a quick list of what you’ll need:

1 Ball jar, any size
1 container of hand soap (be sure it also has the pump)
6000 glue, pliers, either a drill with large bit, or just a large nail and hammer

For the lid, all I did was start a hole in the center. I worked my pliers, pulling back the tin until I had a hole big enough that would accommodate the pump. (This part was easy, as the tin is not especially thick.)


As soon as you know it fits, take 6000 glue and glue the cap around the pump to the lid. I put it between two blocks to let it dry overnight.


Just be sure that the hose just touches the bottom of your jar (I had to cut mine a little to make it shorter). Pour in the soap, then attach the lid and jar ring. There you have it! So kitchey-cute, great for presents with jute twine or initials done in vinyl!

Pin It

I can’t thank y’all enough for stopping by and taking a peek into my little craft world! Please be sure to leave a comment, I love and read each one!!! I'm sharing this decorating idea with the following link-up parties:

CraftOManiac
TaterTots and Jello
Design Dazzle
Uncommon Designs
Savvy Southern Style
The 36th Avenue
Five Days, Five Ways
French Country Cottage
I Should be Mopping the Floor
At the Picket Fence
Be sure to go by and see all of the other great ideas for DIY crafting!

Sunday, March 18, 2012

Chevron Easter Egg Burlee

I am so EGG-cited to show you my newest craft! I get so many great ideas from different places: Pinterest, antique stores, HGTV, and link-up parties! I’ve loved all of the crafters out there that have made these awesome door hangers with burlap, or BURLEES like a lot of them are called ;)

I really wanted something done for Easter, and just happened to have a perfect cut of burlap left over from my Button Cross project. I’ve searched on the web and sooooooo many of these cute burlees are really expensive! So, of course, knowing that I just couldn’t shell out between $30-$50 for one, I had to come up with my very own.

I’ve been falling for chevron ANYTHING lately, so I decided to do my very own burlee Easter egg with a chevron print! Here’s how I did it:

Materials needed:
Burlap
Your choice of paint, two colors
Sponge paint brush
Floral or painters tape
Small piece of ribbon or wire 6”
1 yard tulle
Hot glue gun, thread, sewing machine

First I had a piece of burlap, when folded in half, came out to about 16” x 21”. I hand drew the shape of an Easter egg on it then cut it out. Then, with some floral tape {painters tape would work really well too}, I started cutting pieces of tape to a length I thought would be good for the chevron print {It did take a couple of times to get the first row right, but then after that, it goes pretty fast}. I was lucky that I had the help of Ms. M to cut the tape for me, then I eye-balled the layout and this is what it looked like:

WHEW! This part did take about 30 minutes to do, but was glad I took the time to get it done right.

Then, with a couple of boxes under the burlap, I started stippling on the pink paint like this:

This is what it looked like when it was all done:

Remove the tape and this is how it will look:

I let it dry overnight………. While that was drying, I figured I’d love to make it a little more personal, so printed out “The Hutchison’s” in a font that I love called BLACK JACK.

And, of course, this part took about 45 minutes to cut out to make a stencil {Did this while watching “Fairly OddParents” with the kids, ‘cause I’m a good Mom like that. Took about 1 ½ episodes! LOL!}. I would recommend maybe taping over the paper with clear packing tape to give the stencil a little more stability before cutting out {just a little helpful hint}, and use small, really sharp scissors if you have them.

Stippled on some pretty dark brown umber paint over this stencil, let it dry for just a little while, then peel off.

For the “stuffing”, I used some tan colored plastic grocery bags! You know, reduce, reuse, recycle! They were the perfect filler. Just sew (or hot glue) around the edges, {be sure to leave some stuffing room}, stuff, then sew or glue shut.

I bought 1 yard of a pretty shimmery brown tulle at Hobby Lobby for .99. Just make into a bow and hot glue to the top of your egg. I added a loop of ribbon to the back to hang on the door. Here’s the finished project………

Pin It
I’m sure this will be the first of many burlee’s that will grace my front door!

Y’all be sure to leave a comment! I read each one and would love to hop on over to your blog too!

I'm sharing this decorating idea with the following link-up parties:

CraftOManiac
TaterTots and Jello
Design Dazzle
Uncommon Designs
Savvy Southern Style
Be sure to go by and see all of the other great ideas for DIY crafting!

LinkWithin

Related Posts Plugin for WordPress, Blogger...
UA-9462558-2